Showing posts with label iOS. Show all posts

Friday, 27 October 2017

How to Record iPhone Screen Without Jailbreak or Computer


With the release of iOS 11, Apple introduced a native screen recorder that allows users to easily record their iPhone screen. If you are among the folks who haven't updated to iOS 11, then you must have been wondering if there's anyway you can record your iPad or iPhone's screen activities. The answer is yes, as there are a lot of screen recorder app for iPhone that lets you record your iOS screen. Out of all these apps, we discovered that AirShou is undisputed, since it does the work of recording iPhone and iPad's screen without jailbreak or computer.
Also Read: 5 Best Cydia Tweaks For iOS 10.
AirShou is a dedicated screen recording app for iPhone developed by Shou team, the app acclaims came to be after discovering that it uses less processing power but at the same time renders high quality recording of your games and apps. AirShou is exceptional, it is lightweight, free and offers handy features needed for the perfect screen recording. The app requires an iOS 7 or later, and it offers universal support for iPhone, iPad and iPod Touch. Not to mention but a few, below are what makes "AirShou" standout from other screen recording apps.
  • Light processing​ usage, but powerful recording
  • High resolution screen recording up to 1080p @60FPS
  • Unique and high quality stereo internal system sound recording
  • Records screen in four orientations without time limit

Install AirShou

Having seen the main features of AirShou screen recording app for iOS, the next step is to install it. Unfortunately, this app isn't available on the App Store, hence you'll need to sideload it from a third party website. So to begin with, head over to iemulators.com/airshou, scroll down till you see AirShou. From here, click on the app icon, then tap the 'Install' button from the pop-up window that will appear. Once the download process is completed, fire up AirShou.


Trust the Developer

The initial opening of AirShou will require you to trust the app, else you won't be able to run it at all. So to bypass the "Untrusted Enterprise Developer" warning, navigate to Settings >> General >> Profiles & Device Management, then find the profile that corresponds with AirShou and trust it. Now you are ready to record your iPhone screen.


Record Your iPhone Screen

After trusting the developer, launch Airshou and log in or create an account. Next, select "Record" from the main screen and provide the video name. From here, you can choose your preferred orientation then tap the next step button. Now swipe up from the bottom of the screen to access the control center, select "AirShou" from the "AirPlay" list and enable Mirroring.


That's it!. AirShou will start recording your iPhone screen automatically as soon as the AirPlay Mirroring is connected to a Wi-Fi network. So you can go to the home screen and start performing some activities. To stop the recording, fire up AirShou and hit the "STOP" button. To view your recorded activities, tap the icon at the upper right corner of the screen and choose either to play the video within AirShou or save it to Camera Roll.

Wrapping Up

Using AirShou to record your iPhone screen activities works like a breeze, and there's no need to jailbreak your iOS. The app can run in the background while playing games and its quality is in one word excellent. If you're faced with any problem while installing the app or during screen recording, do let us know.

Saturday, 14 October 2017

How To Get Rounded Screen Corners on Any iPhone


LG G6 and Samsung Galaxy S8 where the first smartphones to spot a subtle rounded corners on its display, and this new design makes both device look more refined. Other smartphone manufacturers have decided to follow suit with this new trend. As you can see, the rounded corners are visibly present on the display of every high-end Android phone developed in 2017 including the new LG V30 and Google Pixel 2. We'd hope for this tradition to be safely maintained in the upcoming smartphones.

Following the release of Apple's iPhone X, 8 and 8 Plus, one would think that the three device will spot a rounded display corners. But the scenerio was contrary to what we had thought, as the new rounded corners was visible only on iPhone X. The rounded corners found on the brand new iPhone X (ten) display made it look quite exceptional, but while it's only exclusive to the iPhone X, there's also a way to get the feature on older iPhones and we're going to achieve this with just a simple tweak.

Install RoundScreenCorners

To begin with, you'll need to make sure that your iPhone is jailbroken and that you have installed the latest Cydia app. From here, simply locate and open Cydia, then search for "RoundScreenCorners" without quotes. (Note that it's a single word, so don't give any space). Once you have found the tweak, download and install it directly on your iOS device. Alternatively, you can navigate to the big boss cydia repository website and download the RoundedScreenCorners tweak.

RoundedScreenCorners

Enable RoundScreenCorners

Next up, respring your iPhone and head to Settings >> RoundedScreenCorners. From here, simply enable the tweak and adjust the Radius Option to your liking. One cool stuff you'd notice about this tweak is that it does not require a respring, so once you enable it, go ahead and adjust the Radius by using the slider. Changes will take effect immediately.


One thing to add, when you apply this tweak on your black iPhone, it'd look awesome but if you are using a white iPhone, then you'll see the LCD. The will makes it to look really annoying and unpleasant. Apart from this, the "RoundedScreenCorners" tweak works perfectly well and you can try it on your iOS device to get a subtle and refined rounded screen corners.

Saturday, 23 September 2017

How to Convert WhatsApp Voice Notes to Text


WhatsApp is a very popular social media messaging app for smartphones, offering a lot of significant features that allows users to communicate with family and friends. With over one billion monthly active users, WhatsApp brings the functionality to send end-to-end encrypted messages, videos, gif, images, audio files, documents, contacts, user location and most importantly voice notes. The platform also allows for group communication. If you're a WhatsApp user having lots of foreign & local friends, then you may have been receiving tons of voice messages that aren't understandable or you're not just able to decipher or listen to them at that particular time.

What if you can convert those voice notes to text and then listen to them whenever the situation permits you to?. Yeah this is quite possible, as you can comfortably use "transcriber for WhatsApp" to convert WhatsApp voice notes to text without any limit. The app is pretty accurate, and we've personally tested it on Oneplus 3T running on Android 7.0 Nougat and found it to be working quite perfectly. Without further ado, here's​ the perfect method to convert WhatsApp voice messages to text.

Install Transcriber for WhatsApp

To begin with, head over to the Google Play Store and install Transcriber for WhatsApp. There are other similar apps that claim to be able to convert WhatsApp voice notes to text, but Mirko Dimartino's transcriber for WhatsApp is the one that works best and it is the one you should be using.

Choose Language

Once the app is installed on your Android device, locate and open it from your app drawer. From here, you'll be greeted with a brief instructions​ on how to convert your WhatsApp voice notes to text by using the all popular Transcriber. Simply swipe your screen from the right or tap the arrow icon to skip the introductions.


The moment you enter the app's interface, you will​ be allowed to select the current language you're using. To simply put, there are 11 languages supported in transcriber. Under UI, you can configure the options in there to your preference. Once you're done then it's time to convert WhatsApp voice notes to text.

Convert WhatsApp Voice Notes to Text 

Now open your WhatsApp messenger app, tap on a user contact and locate the voice note you wish to convert to text. Next press and hold the voice note, then click on the share icon that's located at the top bar of WhatsApp. From here, choose an action by selecting "transcriber" from the lists. The voice note will automatically start a rapid connection & within seconds, your voice note will be transcribed to text.


You can copy or share the converted voice note to anywhere. Transcriber has no limit as you can be able to convert numerous number of WhatsApp​ voice notes to text without a seconds and everything is quite accurate. There's no annoying ads and it's lightweight. Overall enjoy your converted WhatsApp voice note on Android.


For iOS users, you can install, you can also convert WhatsApp voice notes to text by installing Audio to Text for WhatsApp. Open the app and grant it the permission to access speech recognition. Then open WhatsApp, tap and hold on a voice note, from here, press "forward" and tap the share icon at the bottom right corner of the screen. Next select "Audio to Text" from the list and wait till the voice note is converted to text. That's all!.

Thursday, 17 August 2017

Continue Playing​ YouTube Videos After Locking Your Phone Screen


Yesterday was quite a busy day, i slept like a baby and woke up rejuvenated. Having had a glimpse at the wall clock, i realised it was almost night fall and the weather was cool too. So i decided to listen to some YouTube videos while doing some chores. I started with Alan Walker song titled Faded, since it was one of my favourites. Upon locking my device, the video got paused. I was irritated beyond control, as all i ever wanted was to listen to the audio from the video. Moreover listening to YouTube videos with the phone screen off can preserve the battery's​ life. So after experiencing these problem, i decided to sought-after a workaround and i finally found one. Listening to a YouTube video in the background even when your device's screen is off can be achieved if you have a YouTube red subscription. But this service comes at a price of $9.99/monthly and it is only limited to the folks living in the US. But in this article, i am going to teach you the best way to continue playing YouTube video even when your phone screen is off. There's no root access involved, and you don't need to pay a dime.

Also Read: How To Enable YouTube Background Playback On Android.

1. Mozilla Firefox

Firefox is an independent browser created by Mozilla. Offering an intuitive visual tabs, it's one of the fastest, smart & personal web browser you can use. Firefox anticipates all your needs, and it provides you with add-on that can help in personalising your internet experience. Using Firefox to play YouTube videos even when your phone screen is off can be a very tricky business, but it can be achieved​ nonetheless.


To begin with, head over to the Google Play Store and install Mozilla Firefox.  Now open the app from your device app drawer. From here, simply tap on the 3 vertical dotted line at the top right corner of Firefox. Then tick to enable "Request desktop site". Next login to YouTube and search for the video you want to play or listen to. That's it, simply select the video and lock your phone screen. You'll see that the video will still be playing.

2. Google Chrome

Google Chrome is one of the most used and undisputed browser designed for Android, iPhone and iPad. Chrome brings an inbuilt Google translator, allows for fast download and it enables you to view webpages and videos when you're offline. Apart from this, chrome brings handy features and it helps to keep your phone safe when you attempt to navigate to dangerous sites.


As usual, you can use the Google Chrome to stream YouTube videos even when your phone screen is off. The procedure is similar to what was demonstrated using Mozilla Firefox, so it isn't complicated. To get this one going, navigate to the Google Play Store and install Google Chrome. Locate and open the app from your device's app drawer, tap on the 3 dots to access the hamburger menu then "Request desktop site". Go to YouTube, search and play the video you wish to listen to, then lock your phone screen.

3. Black Screen Of Life

There's always an alternative to apps, and black screen of life is one of the best among the numerous apps that allows you to play YouTube videos in the background while your phone screen is off. Unfortunately the app isn't on Google Play Store, but you can still install black screen of life from here. It's completely free, and there is also a premium version which is ad-free.


Now after installing black screen of life on your Android phone, locate and open it from the app drawer. Next you'll be greeted with a simple user interface. Tap the lone button in the middle to enable BSOL. Now simply put your smartphone inside your pocket or turn it face down on the table. Your device's screen will automatically turn off, allowing you to listen to youtube music videos while preserving your precious battery. Incase the app doesn't work, enable "Compatibility Mode" from the settings menu.

Final Words

Now you can comfortably play or listen to YouTube videos even when your phone screen is off. For iPhone and iPad users, the Safari browser can also allow you to continue playing YouTube videos after you've locked your phone screen. To do this, simply open YouTube via the Safari browser, then search and play the music video you wish to listen to. Minimize to your home screen, you will notice that the video have paused. Don't panic, simply swipe up to call-out the control center then tap the play button and the video will start playing again. Now lock your phone and continue listening to your music.

Sunday, 13 August 2017

5 Best Cydia Tweaks For iOS 10


If you've successfully jailbroken your iPhone or iPad, thus freeing from Apple's encrusted grip, then you're one step ahead to enjoying​ an intense customization. Assuming you're​ new to iOS and perhaps loves to tinker with your iDevice, then changing the look and feel of your iPhone or iPad will certainly require a colossal number of special tweaks. One of the major ways​ to customize your iOS is to install the popular cydia app which gives​ its users access to manage everything on their iOS.
Also Read: How To Enable Split View and Slide Over Multitasking On iPhone.
Cydia as we all know, is basically just like the apple store, but this time around it's meant only for jailbroken device. The cydia store is filled with alot of jailbreak tweaks that can possibly help you to customize and enhance the functionality of your iPhone or iPad. Cydia repositories contains a huge catalogue of tweaks that may seem difficult to choose from considering the compatibility issues​. Hence we geeks over here at techviola have decided to unveil the best cydia tweaks for iOS 10 to customize your iPhone and iPad.

1. Activitor


Activitor is doubtlessly one of the best and most used cydia tweaks ever seen. Offering a bunch of plethora features that comes in handy for the management of your iOS, it is basically the backbone of other useful cydia tweaks. Activitor brings slew of options for centralized gestures, button and shortcut that'll enable you to do​ just about anything and even set up custom gestures that can be used to launch apps. Many iOS 10 jailbreak tweaks rely mostly on activitor in other to function properly. Hence it's a powerful tweak that you must take advantage of.

2. Defluxit


If you're looking for a way to apply a unique and perhaps an appealing fade effect to your iOS lock screen notifications, then defluxit can do the work accurately. The tweak allows incoming notifications to fade away once they're received on your device. Defluxit also brings cool options you can configure from the settings menu. Once enabled you'll be able to change the fade percentage by dragging the two slider and there's also a button for respringing your device. If you're a fan of fading notification, then you'll love this tweak.

3. Springtomize 4


Springtomize is yet another essential cydia tweak that offers a lot of features, typically like all-in-one. The tweak brings over 100 different options that allows you to have full control over how your iOS behaves or looks. Springtomize unveils an awesomely improved user experience, giving you the opportunity to set up a lock and scroll animation effects . You can change the size of the icons​ on your homescreen and even hide the dock on your iOS without respringing your device since every aspect of springtomize's customization is applied in real time. It's really one of a kind.

4. HideMeX


HideMeX allows you to experience extreme iOS customization like never before. Similar to springtomize, hidemex offers a slew ton of options that allows you to customize the look, feel, behaviour and every aspect of your iOS device. Hence you can use hidemex to hide icon lables, and even change the lock screen clock text sizes. Truthfully, HideMeX gives your iOS device a complete makeover as you can also give blurs to your own color tint and even replace blur styles. Simply get hold of the tweak, then head over to Settings and configure some options.

5. Onion


Onion is one of the best cydia tweaks that is compatible with iOS 10. It simplifies your iDevice control center, thus giving it a cool, simpler, minimalist and sleeker look. Onion basically removes a layer off your device's​ control center to give the entire look a nice translucent blur. Hence onion increase the level of transparency on your iOS control center and by so doing, it gets rid off all the unnecessary dark mode rocking on the control center. Onion doesn't bring any options to configure, once you install it, changes will take effect immediately.

Other Cydia Tweaks

  • Polus
  • Devaju
  • Stauspeek 2
  • Noctis
  • PreferMyFi 2

Final Words

Cydia is the best alternative to Apple iTunes Store, it offers a lot of handy tweaks that'll help you to customize every aspect of your iDevice. We've listed the best among the best of numerous cydia tweaks, but trust me the lists are endless. Cydia bigBoss repository contains alot of tweaks you can install, all you need to do is, jailbreak your iOS, install the famous cydia app and unleash your iOS potential with numerous tweaks you can lay your hands on.

Wednesday, 29 March 2017

Turn Your Smartphone into a Set of Wireless Keyboard and Mouse


Our smartphone functionality has began to improve quite rapidly. Courtesy to the various handy apps and tools that allows us to take things to the next level. Before now, there was not much to do with our smartphones. Except for playing games, music and answering calls. However, the case is now different, as we can now do a lot of things using our smartphone. Most of the tasks that were once only done on a computer can now be achieved with our smartphones. Fascinating huh! This does not mean you shouldn't have a computer and a phone at the same time, as having both can still come of neccesity, enabling you to carry out critical tasks all together without any hassles.

If you've ever wanted to turn your iPad, iPhone and Android into a wireless user-friendly remote mouse and keyboard for your computer, then it is possible with a remote mouse app. Imagine when you're lying on a bed at night watching multiple movies non-stop. There's no need to get up and start typing on your keyboard, or to pause/play the movie. You can simply take control of this task by lying on your bed.  Remote mouse unveils a simulated touchpad, keyboard and featured remote panels, to make your remote experience simple and efficient. The app can be of essence, if your mouse or keyboard is broken. Here's how to use it!!.

Install Remote Mouse Server on Your Computer

To begin with, you will need to install the latest version of Remote Mouse Server on your computer. Simply navigation to the Remote Mouse website or click here to head over to their download page. Now install the software on your Windows or Mac. As of now, you can download and install Remote Mouse Server on your Windows 8, 7, Vista, XP, and Mac OSX 10.5+.


Install Remote Mouse on Your Mobile

Next you'll need to install the latest version of Remote Mouse app on your smartphones. So to get this one going, head over to your respective phone's store, then search for the app & simply install it. Alternatively, you can install Remote Mouse for either Android, iOS, or Windows Phone by clicking here.


Connect Your Mobile Device to Your Computer

Next you'll need to connect your mobile device and computer together. So make sure that your mobile device and PC are connected to the same Wi-Fi network, & then open Remote Mouse on your mobile device. From here, click "Start" button. The app will begin to search for a nearby server(s) and connect to your computer automatically. If more than one server is found, a list of servers will be prompted for selection.


Optionally, you can connect your mobile device to your computer by entering your computer's IP address or QR code. (Note: the connected IP address will be saved in history list automatically for a next use). Also remember, to setup a password for connection on your Mac / PC and protect your computers from being connected by others. So enter the same password on your mobile device to connect. Once you are connected, you can now begin to use your mobile as a mouse and keyboard for your computer.

Use Your Phone as a Keyboard

With remote mouse, you can easily use your phone as a keyboard for your PC or Mac. Once you're connected, just tap on the keyboard icon from your mobile and start typing. You can be able to see your text both on mobile screen & computer. But if you find this unpleasant, and thus do not want the text to be displayed on the mobile screen, then you can toggle the Show Input Text option via Settings.


You can remotely type with your voice by using remote mouse, and moreover, the app unveils a numeric keyboard. Apart from this, remote mouse features a key combination input & the keyboard is also functional when you switch to landscape mode.(Requires Pro to Unlock). Remote mouse brings a "return" key, & it works the same as hitting "Enter/Return" on your computer.

Use Your Phone as a Mouse

With remote mouse, you'll be able to use your phone as a Mouse for your PC. So to get this one going, just move your finger across your mobile screen to move the cursor. Tap with one finger to left-click, with two fingers to right-click, and also pinch to zoom in. If you find this tiring, you can get all the buttons which you see on the real mouse on your mobile screen. To achieve this, you'll need to enable the "Mouse" option in Panels section which can be accessed through the app menu. Remote mouse features a fully simulated mouse, magic trackpad and multi-touch gestures.


Open Your PC Apps with Your Phone

Remote mouse can come of great essence when you want to access all the apps on your PC with your phone. Simply click on the respective window icon from remote mouse which is installed on your mobile, then remote mouse will unveil or list out the apps on your computer's dock. Now tap on the app you want to access, and it will open instantly on your PC. You can open apps like notepad, power point and microsoft word etc. However i haven't figured out a way to close the apps once they're open. So you will need to stick to doing this manually from your PC or Mac for now.


Use Your Phone to Power OFF & Restart Your Computer

You can also use remote mouse to power off and restart your computer, as well as put it to sleep and log out of your profile. Notice the play icon integrated into the remote mouse app, this will allow you to control music in iTunes, Keynote, Hulu, and Windows Media Player. You can also adjust your PC's volume or change slides by using your device's volume buttons. If you want to use "Spotify Remote" & the "Media Control" you'll need to unlock it, but at a little cost.


Remote mouse also brings an air "mouse mode" feature, who'll will allow you to shake your mobile to move the cursor. If you want to tinker with more options in the remote mouse app, then head over to the Panel and Settings section. From this area, you enable left hand mouse, & also change trackpad background etc..

Final Words

Guess we are already through here. With remote mouse, you can become lazy and that's deserving. The app can help you to control your PC or Mac directly with your mobile. Remote mouse features a unique and customizable interface, app launcher and switcher. Overall, you will be able to use the app to play music, open apps and perform other tasks. All you need to do is simply to sit back and use your Android, iPhone, iPad and also Windows Phone to remotely control your PC. In summary, Remote Mouse is a handy tool which can turn your mobile phone or tablet into a wireless user-friendly remote control for your computer.

Wednesday, 1 March 2017

The Best Aviation Apps For Android, iPad and iPhone


An aviator or perhaps a pilot needs more room for learning, it does not matter whether you're a commercial or private aviator. As a brand new pilot or even an expert, there's a need for you to start somewhere, installing most of the best aviation apps on your iPhone or Android can actually help you expand. Over the years we have seen a ton of aviation apps specially designed for Android and iOS device, but it is believed that iOS device unravels more essential aviation tools than Android. Whatever your opinion might be, it might contrary be different from mine since most of the best aviation apps for Android and iPads unveils options for flight training, weather report and much more. Thus in this article, we're going to list out the best aviation apps for iPads, Android, and iPhones.

1. Avare (Android)


Avare is one of the spectacular aviation app for Android which was made by and for pilots. The app is specially designed for flying in the USA and some parts of Canada, but it provides non current TPC charts for most of the world, and ONC charts for Canada, EU,  South Asia, and New Zealand. With an intuitive user interface, avare is easy to learn and use, Avare also provides offline moving map on all FAA charts but like other aviation apps for device, Avare isn't FAA certified but may be used as outlined in FAA documents. Apart from this, Avare brings plethora features and once installed, the app begins fetching an aviation database and at least one chart but you can also choose additional charts and materials for Avare to download for free.


2. ForeFlight Mobile EFB (iPad and iPhone)


ForeFlight is probably one of the most popular and widely used flight planning and electronic flight bag app for iPads and iPhones. Indiviual pilots and professional flight crews all over the world use ForeFlight to plan and file flight plans, access preflight and in-flight weather. They can also download and view electronic charts and maps, manage flight publications, log flight time, and more. ForeFlight unravels essential features and you can easily use the app "Graphical Briefing" to get all the weather information you need in other to feel confident and ready for takeoff. The app also provides an option for you to file, amend, or cancel VFR and IFR flight plans from your mobile device. Also the "Hazard Advisor" which serves as a moving-map overlay helps to tracks your GPS position and altitude in other to depict hazardous terrain and obstacles.


3. Garmin Pilot (Android, iPad and iPhone)


Garmin Pilot is the comprehensive suite of tools designed specifically for general aviation and corporate pilots. The app includes Flight planning, charts, weather briefing resources, Lockheed Martin, DUATS filing, interactive maps and navigation capabilities. Garmin intuitive interface mirrors those on the newest Garmin touchscreen avionics so you can go seamlessly from preflight to inflight. Similar to ForeFlight, Garmin pilot brings an inbuilt "Logbook" which automatically generates entries based upon GPS data collected during the flight, tracks currency, supports manual entries, endorsements and creates reports. Also with Garmin Pilot, data can be displayed over a VFR sectional or an IFR low or high en-route chart to visualize the weather for your route. The app inbuilt "NavTrack" feature helps you to view weather along the planned route. Garmin pilot is also available on iPad and iPhone thus you can grab it from iTunes store.


4. MyRadar Weather Radar (Android, iPad and iPhone)


MyRadar is a real-time weather radar with temperature, hurricanes, widgets and free warnings. The app is fast, easy-to-use & no-frills, it displays animated weather radar around your current location, allowing you to quickly see what weather is coming your way. All you've to do is just to start the app, and your location pops up with animated weather which tells you if rain is headed toward or away from you, and how fast it is descending. MyRadar brings a map that has the standard pinch and zoom capability which allows you to smoothly zoom and pan around the United States and see what the weather is like anywhere. In addition to this features of MyRadar, the app brings severe storm warnings for your area, and real-time hurricane tracking. The app also brings a layer that provides Airmets and Sigmets, and even the ability to overlay the flight plan of a particular aircraft onto the map. MyRadar is available on Android and you can grab it from the Google Play Store.


5. Sporty's E6B (Android, iPhone and iPad)


Sporty's E6B is a powerful flight computer app for aviators, it includes all the features of Sporty's traditional E6B, including 23 aviation functions, 18 conversions and complete timer features. The app's user-friendly design makes calculations fast and easy. Each function can be selected from a plain English list, and the app prompts the user for information as it goes. Plus, the entries are saved from previous calculations, so there's no need to re-enter data. You can easily calculate weight and balance using sporty's E6B. The app is most suitable for student pilot since it makes quick work of navigational and fuel problem. But it also includes a number of features that are useful for experienced pilots, such as Top of Descent, Specific Range and Planned Mach. You can also set the timer to count up or count down, so it is perfect for timing approaches, holds or switching fuel tanks. There is also a clock function that shows Home, Local and Zulu time. Sporty's E6B is available on the iTunes store for iPhone and iPads.


6. WingX Pro7


I have always emphasised that Android isn't losing when it comes to Aviation, but our opinion might vary. WingX Pro7 was a popular aviation app that hit the iTunes store first before unraveling itself on Google Play Store. WingX is the best GPS-Enabled Moving Map for aviators, the app brings an awesome user-defined enroute transparency and it includes VFR Sectionals, IFR Enroute Low and High, and WACs. Apart from this, WingX Pro7 feature a split screen, track up, weather briefing, conversions, winds aloft and runaway winds. Also just like ForeFlight, WingX Pro7 allows it's users to easily file, close, and cancel flight plans. The app also includes color-coded and decoded METARs, TAFs, winds and temperature aloft. You can also use WingX to calculates METAR Density Altitude and Freezing Levels. Overall WingX Pro7 is the best alternative if you're probably looking for an aviation moving map app since it contains built-in mini manuals. WingX Pro7 is available for Android on the Google Play Store.


Final Words

The above aviation apps can actually not be your favourites, but trust me they can completely enhanced your learning since they're the one's been used most often. Thus if you're a brand new iPhone, iPad or Android pilot, then you'll need to start from somewhere and that's by Installing the above aviation apps on your device. Overall these apps are probably what most aviators have been waiting for!.

Monday, 20 February 2017

How To Enable Picture in Picture Mode On Your iPhone


The iOS 9 Picture in Picture multitasking was one of the finest features integrated in iPads. We've seen numerous features the iPads unravels which wasn't enabled on the iPhones. Apple considered the larger screen on the iPads to that of the iPhones since there rationale could probably revolve around the fact that iPhones medium screen can't utilize this essential features. However from my own perspective, there's a high tendency that the iPhones can run this features without any hassle. The iPhone 6 and iPhones 7 for instance brought with it a premium specifications that is capable of running any app or games, so why would there be bugs, lags or issue if the Picture in Picture mode is integrated in it?.
Also Read: How To Enable Split View & Slide Over Multitasking On iPhone.
Earlier in one of our previous articles, i highlighted the 3 multitasking features integrated in the iPads (Slide Over, Split Screen and Picture in Picture mode). We thus went further to unravel the perfect methods to get this features on iPhones except for the Picture in Picture mode. The iPads Picture in Picture feature allows you to watch videos in a small thumbnail or pop-up window over other apps whilst you perform other functions simultaneously on your iDevice. Seen the important of this feature, we've figured out a way to enable the iPads Picture in Picture multitasking feature on your jailbroken iPhone.

Note: This procedure requires you to have Cydia app and a Jailbroken iPhone, so if you haven’t jailbroken your iPhone, headover to Google and quickly look for a guide on that.

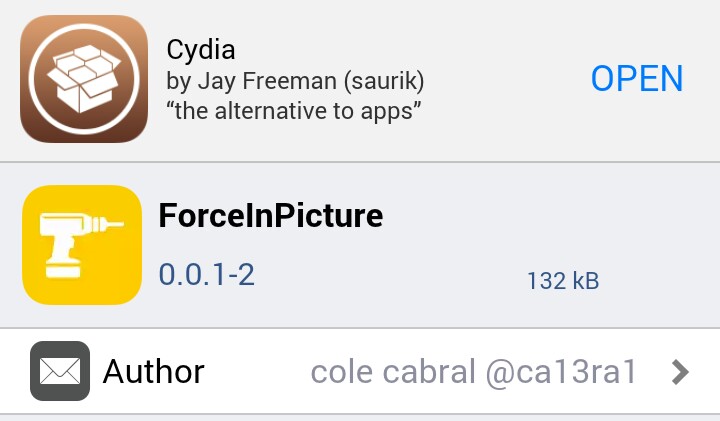
Install ForceInPicture

ForceInPicture is a cydia application that "programmatically" enable Picture in Picture feature on unsupported and jailbroken iOS devices. The app is very simple to use and there's no options to configure. Thus to begin with, open cydia app on your iPhone, and search for "ForceInPicture" (without quotes) in the search tab. Next tap the “Install” button followed by the “Confirm“ icon. Now hit “Restart SpringBoard” if prompted to complete the installation process.


How To Use Picture in Picture Mode On iPhone

As stated earlier on, ForceInPicture does not require any knowledge nor special configurations. Thus once you install the app then you're completely good to ride. Simply open a video and you will notice a dedicated button of the tweak. Tap on that button and then tap on the home button and the video that you where playing will show as an overlay at the bottom of the screen. You can reposition the overlay by dragging it with one finger. The overlay has three buttons for the Pause, Close or Return to full size function.


The ForceInPicture tweak is compatible with the default Apple video player so, it will work with the video app and Safari but it certainly won’t work with apps like YouTube, Vimeo and Dailymotion etc. If you want to watch the videos of these apps as an overlay then you can open the same videos in the Safari and then make it as an overlay and enjoy them. Another alternative to enable ForceInPicture tweak on the YouTube app is to install "PipTube", which acts as a YouTube player with the added benefit of allowing for Picture in Picture mode.


Overall the iPads Picture in Picture mode feature comes in handy especially when you want to perform certain tasks on your iDevice. Once you've installed the ForceInPicture tweak and enabled the picture in Picture Mode on your iPhone, you can now painlessly minimize the supported videos and continue watching them while multitasking on your iPhone.


Monday, 13 February 2017

How To Enable Split View & Slide Over Multitasking On iPhone


The Split View, Slide Over and Picture in Picture multitasking feature where reserved only for the iPads which was a courtesy from the iOS 9. Perhaps this was the reason why iPads are more competitive than Microsoft Windows tablets. While this feature has been of detrimental to all suported iPads, many iPhone users have always craved for it. The split view and slide over feature integrated in the iPad technically gives you the ability to have multiple apps on-screen at the same time. We mentioned the Picture in Picture mode earlier on but i won't be going into details since it isn't what we're here for. Just know that this feature was designed for anything video-related and thus it can convert any video to small thumbnail that can sit over the other apps you’re using.


The Split View feature integrated on the iPads allows you to use multiple apps at once while the Slide Over feature allows you to quickly bring up an app in “compact mode” without leaving your current full-screen app. You can’t actually interact with both apps at once, but this is a quick way to bring up a calculator or note-taking app, for example, and quickly interact with it without losing your place in the original app. Now, if you’ve even wanted this feature on your iPhone, I’ll show you how you can get the Split View and Slide Over multitasking on your iPhone.

Note: This procedure requires you to have cydia and a Jailbroken iPhone, so if you haven’t jailbroken your iPhone, headover to Google and quickly look for a tutorial on that.

Install Gorgone

Gorgone is a new free tweak available on Cydia. The app brings the Split View and Slide Over features to any jailbroken iPhone or iPod device. Thus to begin with, open cydia on your iPhone and search for “Gorgone” in the search tab. Next tap the “Install” button followed by the “Confirm“ icon. Now hit “Restart SpringBoard” if prompted to complete the installation process.


Enable Rotation

Your iPhone will restart in a few seconds and "Gorgone" should now be installed successfully. Now we need configure Gorgone’s settings. Thus head over to “Settings” > “Gorgone” and turn on “Enable Rotation“. This option helps to enables rotations in most of the apps and on the home screen. While the second option “Enable Lock Screen rotation” is for iOS 9 only and doesn’t work on iOS 10 at least for now.


Use Split Screen Multitasking On Your iPhone

Once you're through with the above procedures, then it's time to use the split view and slide over feature on your iPhone. Swipe in from the right side of the iPhone's display. A small side pane will appear bringing out the list of all your installed apps. This can be done in either portrait mode or landscape mode.


Now tap an app in the list to load it in the side pane. Then you can interact with the app, without leaving the current app. This works exactly like iPad's slide over feature. Once you swipe back, it will again switch you to the previous app that was running before.


You can also switch between “slide over” apps by swiping down from the top of the app in the sidebar. Simply open a slide over app in landscape mode and you’ll see a handle in between the two apps.


Pull the handle toward the center of the screen to activate the split view feature. You’ll then see two apps on screen at the same time. One app on either half of your screen and you can interact with both at once. To exit the split screen mode, just slide the app away using the drag bar in the middle of both the apps.

Alternatives

Gorgone is a nice app that enables the Split view and slide over feature on your iPhone. However the app tweak does have a shortcoming though. It rotates every app on my iPhone, even those that have the orientation lock enabled. A rotating home screen is something most users would not like. To fix this, you can use a flex patch.  It would be great if this tweak had an up-down split screen instead of the left-right one.


Now if perhaps you don’t like the Gorgone tweak of enabling split view and slide over feature, then Multiview, Splitify, Multify and Medusa are probably the best alternatives to Gorgone. Using "Multiview" tweak, all you've got to do is enable the app via settings after installation and get things going on as it should.